
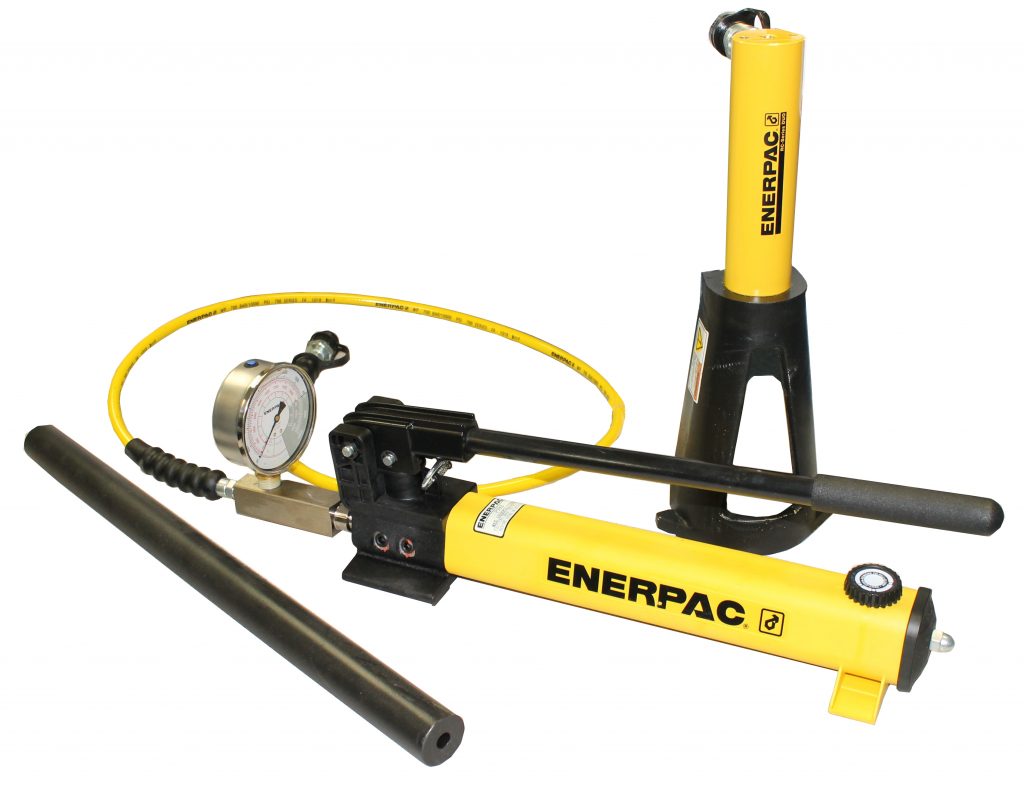
Your feedscrew is stuck…now what? Never fear! First thing’s first, follow the instructions in your extruder manual. Secondly, we recommend using a feedscrew jack to safely aid in this process. This jack employs a long, grooved bar between two hydraulic cylinders actuated by a lever or via push-button operation. A latch engages and pushes the bar forward the distance between the grooves. The latch is then retracted until it picks up the next groove (the above picture is a different model that uses a single-cylinder; however, the procedure is the same).
To give you an idea of what to expect, here are 10-steps applicable to feedscrew removal for most Davis-Standard extruders using a feedscrew jack (please remember the machine must be at operating temperatures for the below procedure).
(1) Shut down the extruder. Shut off water and remove the rotary union and cooling pipe assemblies from the feedscrew. Be sure any pressure is relieved.
(2) Loosen the head clamp and swing or lift the head free of the barrel flange.
(3) Remove the breaker plate, screen pack, etc.
(4) Insert a push rod in the bore of the thrust shaft and against the feedscrew end.
(5) Place the jack bracket in the groove of the thrust shaft and above the two supporting lugs on the rear face of the bearing retainer. These lugs prevent rotation of the jack bracket.
(6) Using the pump handle, increase the jack pressure. This puts pressure on the feedscrew through the pushrod and forces the feedscrew forward and out of the keyways.
(7) Turn the knob to release pressure in the pump. Insert additional spacers between the piston rod of the jack and the pushrod to get more sliding movement of the feedscrew.
(8) Carefully withdraw the feedscrew from the barrel. Using a wire brush, clean the flights, channels, and mixing pins or grooves as the feedscrew is being withdrawn. Make certain not to drop the feedscrew as the shoulder of the feedscrew clears the barrel.
(9) Remove spacers, jack assembly, and push rod from the extruder. The pushrod may be pushed through the delivery end of the barrel.
(10) Place the feedscrew on a wooden bench or V-blocks and thoroughly clean and inspect. Refer to the instruction manual for details.
When installing or removing the feedscrew, be careful not to let the feedscrew drop as the shank diameter changes. This will nick or damage the breaker plate recess, and typically causes irreparable damage. Protect the sealing face by machining a simple ring and inserting that ring into the recess before pulling the screw. Make the ring 0.01 inch (0.25mm) greater than the nominal barrel inside diameter, approximately 0.005 inch (0.13mm) less than the breaker plate recess inside diameter and 1.5 times the thickness of the breaker plate.
In the next blog, we will post about four alternative feedscrew removal procedures used in unique situations.
For additional questions about this or any other feedscrew maintenance topic, please contact marketing@davis-standard.com.
Cheers,
The D-S Connect Blog team
What is cost of the jack system?
I have 1.5″, 2.5″, and 4.5″ Davis Standard Extruders.
Will I need separate jack bracket for each size extruder?
Hi John:
Thank you for your inquiry. May you please email marketing@davis-standard.com with your email address and phone number? I will have someone get back to you with the cost and answer additional questions. Thank you kindly.
Hi John:
Sorry, I just realized I do have your email address. I will forward on to the appropriate person. Thank you and my apologies for the confusion.
I’d like to know the cost we have 2.5 and 3.5 inch extruders.
Hi Eric, thank for your inquiry. I will have the appropriate person reach out to you with pricing. In the meantime, please let us know if you have additional questions.
I’d also like a price for the 2.5 and 3.5 inch extruders
Hi Jerry, thank you for your inquiry. I have sent over your request and someone will be reaching out to you soon with pricing.
I would like the price for 4.5 and 6 inch extruders.
Hi Bob, thank you for your inquiry. I have sent over your request and someone from the team will be reaching out soon with pricing.
i am looking for a jack bracket for the hydrauic cylinder used for pushing the extruder screw out of our davis standard 6” extruders . my jack cylinder mearures 3.358” o.d. could you advise me where to purchase one of these and the price .
Good afternoon Fred, thank you for your inquiry. I have sent over your request and someone from the team will be reaching out soon.
Is this feedscrew removal applicable only to david standard extruder?
Good afternoon Banjo: This is a great question. As a safety precaution and our recommendation, please check the manual first and follow the guidelines. However, as secondary, this is a method that can work on most extruders. We did add one more sentence to the blog that is also important to note, which is making sure the machine is at operating temperatures before beginning to follow the 911 feedscrew removal procedure. Please let us know if you have additional questions; we’re happy help.
Good day Nichole,
Can we ask a copy of the said manual so that we can check if it fits to our 3 extruders.
Hi Banjo:
May you please email marketing@davis-standard.com the s/n # of each extruder? Every extruder comes with a manual; which information may vary if it’s not the same model.
Hello, We have a 1″ extruder. We are in need of the above equipement. Can you please provide us the cost details. Please Email us at pvemula@majikmed.com
Good afternoon Pranay: Thank you kindly for your inquiry. We will have someone reach out to you momentarily.
Hello we currently run 2″ David standard extruders can you advise me where to purchase one of these and the price?
Good morning Mike: Thank you for your inquiry. Someone from our spare parts department will be in touch shortly.
Good Moring all.
Please quote the price of a feedscrew removal for extruder 2.5 and 3.0
Good morning Vladimir. Thank you kindly for your inquiry. We have sent your request to our spare parts team. Someone will be in touch today.
Good Morning,
Is this unit universal? I have a 1.0″ , a 1.25″ , and a 2.0″ extruder. Can I use one unit on all three? Are there different attachments. Please email me about the the cost and lead times.
Good morning Michael: Thank you for your inquiry. I have sent your request to our spare parts team who will be able to assist. Someone will reach out soon.