In Purging – Part II of our Feedscrew and Barrel Maintenance blog series, we will focus on effective shutdown and restart procedures. A systematic shutdown and restart are essential to minimize purge time and ensure a smooth restart. Common sense procedures also minimize material degradation and waste. It is important to note that these procedures should ONLY be performed by trained personnel. Consult operating manuals for special considerations regarding your extrusion system.
Shutdown Procedure
The key to a successful shutdown is to purge the current resin, which is running at operating temperature, with a more stable resin introduced at a colder temperature. This is achieved by reducing the operating speed at the end of a run, thus lowering the temperature to a safe level. The system can then be purged with material offering good thermal stability. A base resin blended with an antioxidant master batch works well for this process.
Following is a procedure developed for a blown film line that can be adapted by adjusting temperatures and times. These factors are a function of the material being processed and the size and design of your extrusion equipment. Use caution and always consult your operating manual for safety instructions.
- Reduce the screen pack mesh if necessary (14,40 mesh).
- Add the purge blend into purge hopper.
- Purging should be done at 75 to 100 percent of normal run speed.
- Lower barrel profile temperature (325oF for PE LD, LLD, HDPE/375oF for PP).
- Back-out variable depth thermocouples.
- Add shutdown blend.
- Shut down at about 25 to 40 percent normal output.
- Drop barrel profile to 280°F flat (280o F for PE to LD, LLD, HD for PP 350o F).
- Watch head pressure as barrels drop.
- When the material runs out of the extruder (amps start dropping), shut it down. For a coextrusion setup, when extruder amps start to drop, slow to 2RPM until all extruders are finished.
- Leave a small pool of material over the die lip to prevent oxygen from getting into the die lip land area.
Restart Procedure
The key to a successful restart is to bring the line to start-up condition at a temperature lower than the normal operating temperature and then heat-soak the line to ensure the material is fully molten before restart. The reason for this is two-fold. One is to reduce exposure of the stagnant polymer to a higher temperature. The second is to maintain a higher polymer viscosity at the lower temperature. The higher viscosity creates scrubbing forces against the flow surfaces, assisting with the purge. A shutdown with a thermally stable material also allows more time and flexibility on the restart.
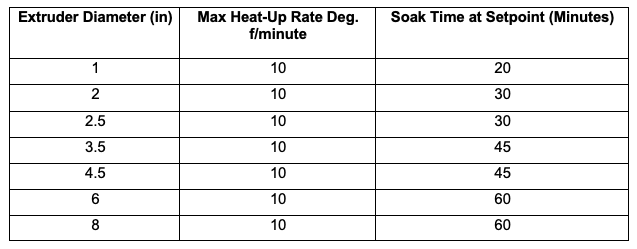
Caution! The size of the extrusion system will affect the heat-soak time to reach an acceptable operating temperature. The design and watt density of the heating system also plays a role. The most important thing is that the polymer is completely melted before restart. Consult your operational manual for recommended heat-up and soak temperatures and times. The figure below shows the maximum heat-up rate and standard soak-times for a Davis-Standard Thermatic® extruder.
Following is a procedure developed for a blown film line processing LLDPE. This example can be adapted by adjusting temperature and heat soak times, which are a function of the material and the size/design of your extrusion equipment. Typically, the heat-up of a large system will be governed by the heat-up rate of the die system.
- Set die temperature to 250°F.
- Soak die for one hour.
- Increase die temperature to 300°F.
- Turn on adapters to 250°F.
- Soak 15 minutes once setpoint is reached.
- Increase the die to 350°F.
- Increase adapters and screen changer to 325°F.
- Turn on the extruders to 250°F.
- Soak 15 minutes.
- Increase the die to 375°F.
- Increase adapters and screen changers to 375°F.
- Increase the extruders to 300°F.
- Set extruders to a 325-340-350-350-350°F LD start temperature.
- Heat soak for 15 minutes.
- Idle extruders during startup (~10RPM), keeping watch on pressure to push out shutdown (dark brown from antioxidant should clear quickly).
- After the material is clear, change the screen pack to the production mesh.
- Clean/shim the die lip area as necessary (a bead of material should be left during shutdown to minimize this step).
- Set production temperature settings and string bubble.
We hope this blog helps facilitate your shutdown and restart procedures! Any questions, please feel free to comment below or e-mail marketing at marketing@davis-standard.com.
Cheers,
The D-S Connect Blog Team
Thanks for your extruder information! I think we need more screen packs. I’ll look for an online shop that has them in stock.
Good morning Sarah:
Our spare parts department does offer screen packs. May I send your email over to the department so they can provide you with a quote?
HI
May you please help me to get a complete pdf file of “operation & maintenance manual” for ER-WE-PA extruder type:
EXTRUDER C: 3.5″ *30D
if there is a “feedscrew removal & assembly” video for the same extruder type. i will be thankful to get.
thanks & best regards
Shakib
Hi Shakib:
Thank you kindly for your request. I have sent this inquiry to our service team. Someone will be in touch soon.
Hi Nichole
Im still waiting for an answer. please send me the direct mail/ phone no. of the related department.
thanks