

Figure 1. Measurement device placed in extruder barrel
In the blog post, Essential Feedscrew and Barrel Maintenance Part I, we discussed the importance of maintaining the clearance between the screw and barrel on your extruder to ensure that your equipment is operating at maximum efficiency.
The clearance between the screw and barrel will increase due to wear over time under normal operating conditions. This wear has two components, one decreasing the outer diameter of the extruder feedscrew and the other increasing the inner diameter of the extruder barrel cylinder. The rate of wear on the screw is designed to occur at a faster rate than the wear on the extruder barrel. This is done for a practical reason since it is easier to replace the extruder screw versus the extruder barrel. This blog will examine how to accurately measure the inner diameter of the extruder barrel.
The ID measurement is made using a custom electronic micrometer mounted on a movable sled, shown in Figure 1 and 2. The barrel must be very clean and at room temperature. The device is calibrated to the original barrel diameter and positioned in the extruder barrel.
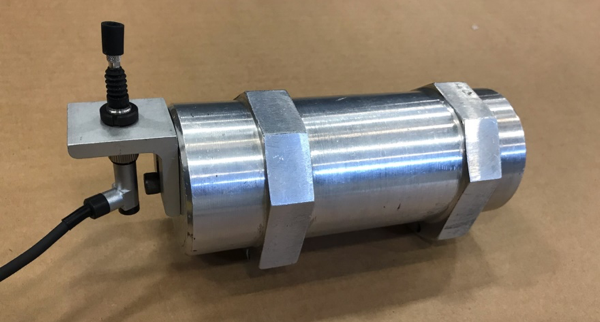
Figure 2. Close up of measurement device mounting sled
The sled is moved, typically in one L/D (Length/Extruder barrel diameter) axial increments along the length of the barrel and readings are taken and recorded. These readings are then compared to the original dimensions showed in Table 1.
Figure 3 below shows the results on a worn barrel that needs to be replaced.
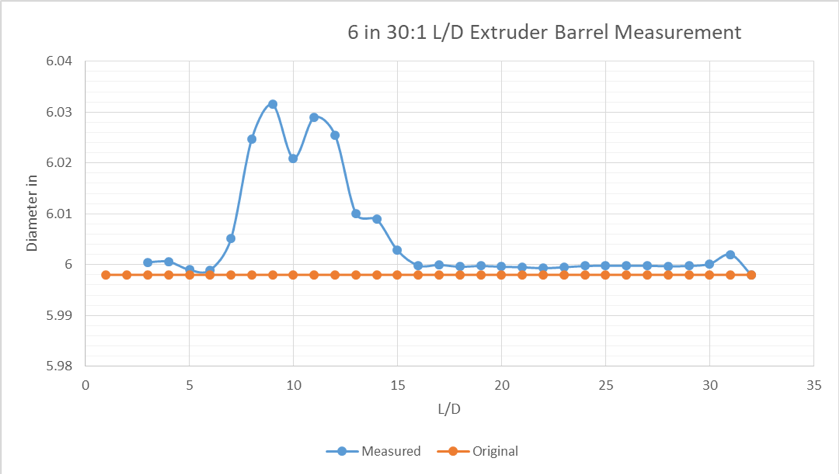
Figure 3. Barrel inner diameter measurement vs. original dimension
Required cleaning tools: wire brush that fits snuggly in the barrel and copper gauze.
Required measuring tools: electronic micrometer
Process: The following steps will ensure accurate measurement and documentation.
- Remove screw from extruder
- Clean barrel at operating temperature – chimney brush mounted on an extension rod
- Allow machine to cool to room temperature
- Using the electronic micrometer, take readings of the diameter along the barrel
- Compare the measurements to the original dimensions by plotting the diameter vs L/D
- If the inner diameter of the barrel is worn to a value that is two times the original radial clearance between the screw and barrel, the barrel should be replaced. See Table 1

Table 1. Extruder barrel inner diameter dimensions
Have questions or a comment about this blog? Please comment below or email marketing: marketing@davis-standard.com
In the next blog post of this series, we will discuss purging methodologies of your feedscrew and barrel. Stay tuned!
Cheers,
The D-S Connect Blog team
P.S. Like what you see here? Please share with your social network!
Most of my clients over the years will not pay the cost of a modern electronic gage to measure the barrel I.D. on each of their extruder sizes.They will pay for a Starrett cylinder bore gage # 452B with a range of 2 1/2 ” to 6″, & that is what most of them still use.These can be set up easily with a micrometer or a caliper gage.I like to use a very lite weight aluminum tube attached to the short handle that comes with the gage in order to push the gage down into the barrel 6″ at a time, or less, & record the readings. You can mark the rod in 6″ increments & then use it to pull out the gage. (Otherwise you need a push rod & a string tied to the gage.)The major problem involves reading the dial indicator beyond about 5 Ft. into a barrel. If you set-up the dial for zero (at 4.500″), then get a young guy with good eyes & a flash lite, he can estimate the readings without actually seeing the numbers & divisions. Obviously, you want to get at least 2/3 into a barrel in order to see the transition area where most wear occurs.Grooves in the barrel can cause a temporary hang-up, but usually this only occurs at the end of a Maddock mixer where metal gets trapped.The beginning of a barrel, near the hopper, is rarely worn unless by a misalignment, plus, many screws are purposely undercut in the initial feed area anyway.This old system may not be the best system, but any decent measurement is better than no measurement.
Thank you kindly for your response, John! There are certainly other methods. We prefer the electronic gauge measuring to get more accurate readings. There is quite a bit of work involved in the 3-point mechanical gauge system and we have discovered the readings are not as accurate. Have you tried both methods? If so, have you discovered the same?
many thanks for your topic today for measuring extruders output/ clearance between screw and barrel , would like to send this in a PDF to my email
Thank you for your response Nagi! We are excited to hear you find this information relevant and helpful. We are happy to send you the PDF version of this blog post. Please check your email in a few minutes.
Please could you advise on a suitable make and type of electronic micrometer
Thanks in advance
Good afternoon Kevin: Thank you for your inquiry. We will be in touch shortly with a recommendation.